You’ll sear bone-in pork chops in cast iron at high heat, developing a golden crust within five minutes while locking in juices. Simultaneously caramelize yellow onions over medium heat for 45-60 minutes, deglazing periodically for even browning. Remove chops at 140–143°F internal temperature, accounting for carryover cooking to your target 145°F. Deglaze the skillet with wine or stock, reduce by half, then mount cold butter for a glossy pan sauce. The interplay between the Maillard reaction on both meat and alliums creates restaurant-quality depth that reveals itself through proper technique and timing.
Why Cast Iron Is Perfect for Pork Chops
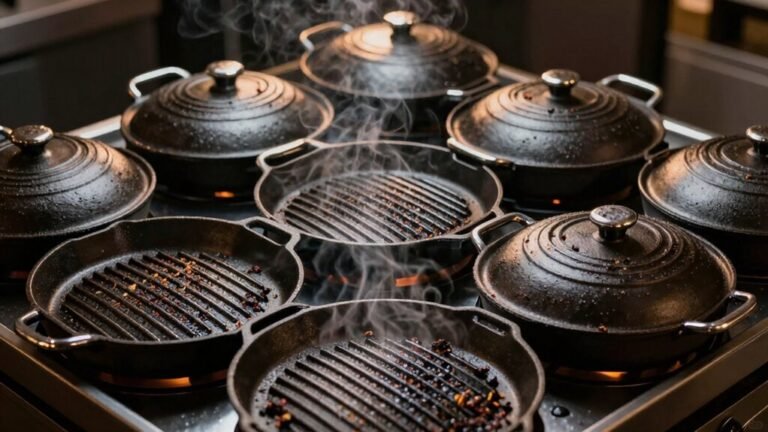
When you’re searing thick pork chops, cast iron‘s even heat distribution becomes your greatest advantage. You’ll eliminate hot spots that compromise doneness, ensuring consistent temperatures throughout your cooking process. The skillet’s superior heat retention locks in juices by maintaining the high temperatures you need for a golden sear without losing thermal energy mid-cook.
Cast iron benefits extend beyond initial searing. You’ll develop a caramelized crust within five minutes using high-heat cooking techniques, pressing the chops for ideal contact. This cooking technique seals natural juices, keeping your pork succulent at 135-145°F internal temperature. To ensure your pork reaches the perfect doneness, use a meat thermometer for accurate temperature verification. The cast iron’s versatility allows you to transition seamlessly from stovetop searing to oven finishing or even campfire cooking for different culinary applications. For optimal results, use bone-in center-cut chops that are 1 to 1½ inches thick to maximize juiciness and flavor.
The cast iron’s durability supports repeated preparations and pan sauce additions like butter and rosemary. Over time, natural pork fats season your skillet, creating an improved non-stick surface for future use. The Maillard reaction during searing creates the savory browning that distinguishes cast iron results from other cookware. When using cast iron on a glass top stove, ensure the smooth skillet bottom is gently placed rather than slid across the cooktop to prevent damage. Proper maintenance of your cast iron pan ensures it will last for generations while continuing to deliver restaurant-quality seared results.
Selecting the Right Cut of Pork
Since cast iron’s heat retention demands cuts that’ll withstand high-temperature searing without drying out, you’ve got four primary options: loin, rib, shoulder, and sirloin chops.
When choosing cuts, consider your cooking method. Loin chops offer mild, slightly sweet flavor with minimal fat—ideal for quick searing. Rib chops deliver robust, savory taste with superior tenderness and marbling, making them restaurant favorites. Shoulder chops require low-and-slow techniques due to their muscular structure, though they’re economical for family meals. The shoulder primal cut includes both picnic shoulder and pork butt subprimal cuts, with pork butt being more tender due to less muscle use.
Sirloin chops present leaner profiles requiring moisture monitoring during cooking. For optimal results, seek all-natural pork cuts that exceed standard quality expectations and ensure superior flavor and tenderness in your finished dish. Proper heat retention from your cast iron skillet ensures even cooking throughout the meat without hot spots that would burn the exterior while leaving the interior undercooked. Using a fitted lid during the braising stage helps lock in moisture and creates an ideal environment for tender, flavorful results, similar to how preheating your skillet on the stovetop ensures consistent cooking temperatures.
For cast iron specifically, select bone-in varieties when possible—they retain moisture better during intense searing and enhance overall flavor profiles. Aim for 1-1.5 inch thickness to achieve prime crust development while maintaining juiciness inside your skillet.
Essential Seasonings and Flavor Combinations
Your choice of cut determines the foundation for searing, but the seasoning strategy you layer on top transforms those pork chops from merely cooked to restaurant-quality. Build your key spices with kosher salt, coarse black pepper, garlic powder, and smoked paprika—this core rub enhances natural pork flavor while establishing a flavorful crust. For herb pairings, fresh thyme added during basting preserves aromatic oils that high-heat cooking would otherwise destroy. Rosemary works best incorporated into finishing butter to avoid bitterness. Bone-in pork chops that are 1-inch thick provide superior juiciness and flavor compared to boneless alternatives. Like Dutch oven cooking, maintaining consistent heat throughout the cooking process ensures even browning and optimal texture. Just as creating a hot and humid environment is essential for achieving proper crust development in artisan breads, maintaining proper heat in your cast iron is crucial for building that desirable sear. Caramelized onions cooked in your cast iron capture fond for pan sauces; deglaze with balsamic vinegar or apple cider to cut richness. Consider compound butter combining minced garlic and herbs for final basting, creating depth that elevates your entire dish. Rest pork chops for 5-10 minutes after cooking to retain juices and ensure optimal tenderness before serving. For accurate doneness verification, use an instant-read thermometer to confirm your pork chops reach the safe internal temperature before resting. Allowing the meat to rest redistributes moisture throughout, similar to the resting period recommended for poultry cooked properly. For meal prep success, vacuum seal] your finished pork chops and onions in individual portions to extend freshness and simplify weeknight reheating.
Preparing Your Pork Chops
Proper preparation separates mediocre results from exceptional cast iron pork chops, beginning with complete thawing using either overnight refrigerator thawing or a 30-minute cold water bath for vacuum-sealed chops. Next, bring your chops to room temperature—allow 15-30 minutes on the counter post-thawing to verify even cooking throughout and prevent overcooked exteriors with cold centers.
Trim the rind and outer fat layer while retaining a modest fat cap for flavor. Pat the surface thoroughly dry with paper towels; dry meat browns effectively while wet meat steams. Don’t overlook the edges—dab them completely and season after drying. Using a digital meat thermometer ensures accuracy in monitoring your pork chops throughout the cooking process. Select thick cuts of at least an inch and a half for better quality and superior moisture retention.
These thawing methods and conditioning steps eliminate cooking variables, assuring superior crust formation and moisture retention in your cast iron skillet.
Mastering the Sear
Start with your 12-inch cast iron skillet heated over medium-high for two minutes until nearly smoking. Add two tablespoons of oil once it shimmers, then place your chops in a single layer without overcrowding. Your searing techniques depend on thickness: press lightly for 3-5 minutes on the first side, flipping only once initially for ideal crust development.
After flipping, reduce heat to medium and add butter with thyme for basting. Continue flipping every 1-2 minutes while spooning the melted butter over the chops. This frequent flipping guarantees even browning and crust development, similar to how properly seared proteins develop a flavorful exterior before slow-cooking. Cook until your internal temperature reaches 125-130°F, accounting for carryover cooking during resting. For optimal juiciness, avoid overcooking your pork chops and allow them to rest for a few minutes before serving. A resting period after cooking ensures the juices redistribute throughout the meat for maximum tenderness. Once rested, you can return the pork chops to the skillet and nestle them into a caramelized onion mixture for a complete one-pan meal. Thicker, leaner pork chops benefit from a quick brine preparation] beforehand to ensure they retain moisture throughout the cooking process. For extended storage of any leftover pork chops, vacuum sealing can preserve them in the freezer for 2-3 years while maintaining excellent quality. Protect your hands while handling the hot skillet by using a crochet handle cover made from heat-resistant cotton yarn.
Caramelizing Onions to Perfection
How do you transform humble onions into a glossy, mahogany-hued complement to your cast iron pork chops? Start with yellow onion varieties for their superior sugar content. Slice them uniformly at 3–5 mm thickness, then pat dry to minimize moisture. Heat your cast iron skillet with butter and neutral oil, adding a pinch of salt to accelerate softening. Begin on medium heat for 5–10 minutes until translucent, then reduce to medium-low. Your caramelization techniques should include frequent stirring during browning, escalating to near-constant scraping as fond develops. Deglaze periodically with small water or wine splashes. Expect 45–60 minutes total. The Maillard reaction deepens color while converting sugars into complex flavors, similar to how heat transforms ingredients through chemical processes like starch gelatinization. If onions brown too quickly, add a small amount of water or wine to slow the process and prevent burning. A cast iron skillet’s superior heat retention makes it ideal for achieving even caramelization without hot spots. Like infrared thermometers that measure temperature changes instantly, cast iron provides immediate and consistent heat distribution across cooking surfaces. For cast iron care, remember that proper seasoning with high smoke point oils maintains your skillet’s non-stick performance and longevity. To restore your skillet’s seasoning after cooking, apply a thin layer of olive oil while the pan is still warm, rubbing it in thoroughly to maintain the non-stick, rust-resistant surface. For optimal storage, transfer any leftover caramelized onions to an airtight container where they’ll keep in the refrigerator for up to a week. Finish with optional acid—vinegar or lemon—to brighten sweetness.
Creating a Rich Pan Sauce
Once you’ve removed your pork chops from the skillet, don’t discard those caramelized fond particles—they’re your sauce’s foundation. Deglaze the hot cast iron with an acidic liquid: dry wine, stock, or vinegar. This dissolves the browned bits and lifts concentrated flavor into your sauce.
Bring the deglazing liquid to a simmer, scraping gently to release all fond development. Reduce heat and allow the mixture to concentrate through sauce reduction—aim for roughly half the original volume to achieve desired viscosity and intensity. For best results, use a heavy-bottom stainless steel skillet or cast iron to ensure even heat distribution during the reduction process. The seasoning layer] created through proper oil use in cast iron provides a nonstick surface that prevents food from sticking during this concentrated reduction. To maintain this nonstick quality, ensure your cast iron skillet is properly seasoned and smooth before beginning your cooking process. For optimal sauce preservation, consider storing any leftover sauce in vacuum sealer bags for extended freshness and freezer storage. Monitor the sauce’s internal temperature with an instant read thermometer to ensure your reduction reaches the desired consistency and intensity.
Like the steak pan sauce technique, incorporating cold unsalted butter while whisking off-heat creates a luxurious emulsification.
For finishing, mount cold butter into the warm reduced sauce while whisking off-heat, creating a glossy emulsification. Taste and balance acidity with a touch of honey if needed. Strain through a fine sieve for velvety texture.
Achieving the Ideal Internal Temperature
While your pan sauce reduces and develops its glossy finish, precise temperature control determines whether your pork chops emerge juicy and tender or dry and tough. Use an instant-read digital thermometer inserted into the thickest part, avoiding bone and fat. Target 145°F (63°C) for whole-muscle pork chops—the USDA’s current food-safety baseline that preserves juiciness better than older 160°F recommendations. Remove chops when internal temperature reaches 140–143°F to account for carryover cooking, which adds 2–5°F during the 3-minute rest. This cooking technique prevents moisture loss that accelerates above 160°F. Fattier cuts with connective tissue may require low and slow cooking to achieve optimal tenderness, though lean chops benefit from the higher-temperature searing method. Similar to layering ingredients in Dutch oven preparations, proper temperature management during cooking ensures even results and optimal flavor development. Calibrate your thermometer regularly and measure again after resting to confirm you’ve reached the safe endpoint without overcooking.
Storing and Reheating Leftovers
Since your cast iron skillet delivers perfectly juicy pork chops, you’ll want to preserve that quality through proper storage and reheating. For leftover storage, refrigerate chops in airtight containers within two hours of cooking, where they’ll remain safe for three to four days at 40°F or below. Freeze tightly wrapped portions for two to three months, using double-wrapping or vacuum sealing to prevent freezer burn and maintain the meat’s quality. Label containers with storage dates.
When reheating, employ gentle techniques to restore moisture. Use the stovetop method—reheat over medium heat in a skillet with broth or butter for five to ten minutes, flipping occasionally. Alternatively, use a covered oven dish at 325–350°F with added liquid for ten to twenty minutes. Thaw frozen chops in your refrigerator overnight before reheating. Avoid microwaving, which risks drying the meat.